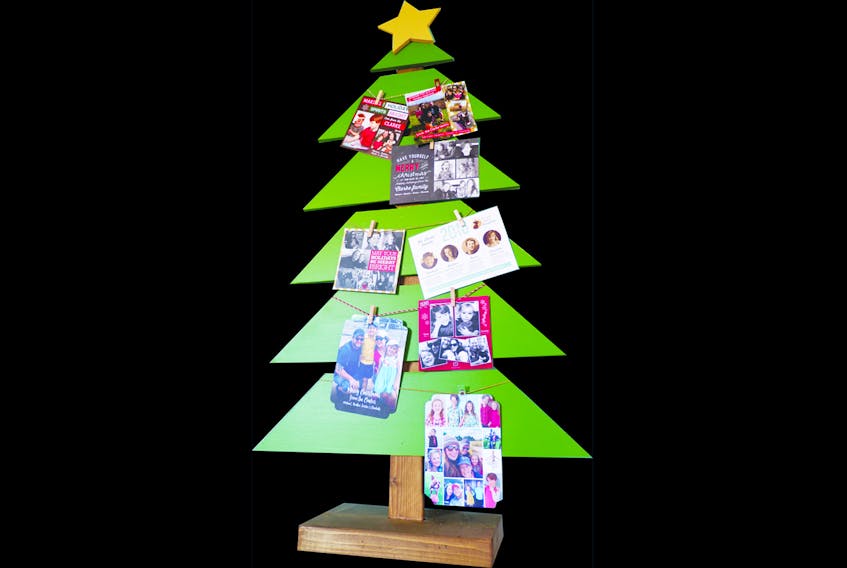
While I love all things digital, there’s one old-fashioned tradition I refuse to budge on. Without fail, our family mails out beautiful cardstock Christmas cards at the beginning of December.
Since our cards hit the mail nice and early, we receive a lot of cards back in return. At first, we tried hanging a long piece of ribbon across the doors that lead to our back deck and using red plastic clothespins to clip up the cards. It looked OK, except for the small detail that we couldn’t use the back door until January.

Last year’s solution was to hang the ribbon across the hutch in the dining room and display the cards that way. But every time we’d open the back door to let the dog out, gusts of wind would send the cards flapping and usually falling to the floor. This year, I was determined to come up with a better way to display our Christmas cards. I designed a wooden Christmas tree card stand that we could stand up on a table in our kitchen or on the floor in our living room — far away from doors and drafts.
If you’re looking for a way to display your Christmas cards without an avalanche of them slipping off the front of your fridge, tipping off your entryway table or taking up space on your kitchen counter, here’s a rundown on how we created a DIY Christmas card tree.
• Taking a leftover piece of medium-density fibreboard (MDF) from another project, my handy husband used our table saw to rip it into 5.5-inch wide strips that would make up the tiers of our cartoon-like Christmas tree.

• We decided the longest, lowest tier of the tree should be 23.5 inches long. Then, he cut most of the additional strips two inches shorter than the tier below. (The second-lowest tier is 21.5 inches long, the third-lowest tier is 19.5 inches long, the third tier down from the top is 17.5 inches long and the second tier from the top is 15.5 inches long.)
• Since we were making a six-tier tree and we wanted the top tier to be tiny, he cut that one to only measure 7.5 inches long.
• Once he had all six tiers cut, he set his mitre saw to a 45-degree angle and nipped off the end of each tier — giving them nice, sharp triangular ends for that classic Christmas tree look. (A 45-degree cut takes off quite a bit, so the lowest tier of the tree measures 23.5 inches long across the bottom, but just 12.5 inches long across the top.)

• Now, it was time for me to paint my tiers. I poured a little bit of royal blue paint into a cup of yellow paint and mixed a custom shade of Christmas tree green. I painted the front and back of each of the six tiers, giving the front two coats for perfect coverage.
• While I was painting, my handy husband worked on the back strip (the trunk of the tree) that would hold all six tiers together. He grabbed an old 2.5-inch wide board and cut it down to 39 inches tall — a good height to hold all of the tiers with a nice gap between them.
• He built the tree’s stand from a foot-long scrap of thick two-by-eight lumber and routed out a groove in the middle so the trunk would rest nicely inside (with a bit of wood glue and an L-bracket on the back). Then, I stained both pieces a rich brown. If you don’t have a router, I’d suggest just making a classic X-stand like folks did for Christmas trees they cut down years ago.

• Once the green paint was dry, I positioned the tiers along the trunk and used my finish nailer to secure them in place (each with about an inch gap between them).
• The tree was really coming together, but it needed a star on top, of course. I printed out the shape of a star, cut it out and traced it onto a scrap of MDF. My handy husband cut it out with his band saw. After a single coat of warm yellow paint, I tacked it in place with my finish nailer.

• The last step was tying baker’s twine or thin gold rope around each tier — stapling it in place on the back, just so the knots would stay put — and adding tiny wooden clothespins to hold Christmas cards. Cards that open can be placed directly over the twine and flat cards can be easily clipped.
This Christmas card stand cost us nothing to build, since we used scrap wood and leftover paint, but it would probably only cost $10 in lumber and a few bucks in dollar store paint, string and clothespins to make your own.
I love that it’s low enough for our children to easily add new cards as they arrive, especially since ripping open the envelopes is usually their job. It’s not blocking any doorways and the cards aren’t going to blow off, but we’re still able to admire the cards sent from our family and friends throughout the whole Christmas season.
This content originally appeared in YULETIDE PREPARATIONS, a SaltWire custom publishing title.


