Some of my favourite Christmas ornaments are the soft felt ones sewed by my mom and her friend back when I was a baby. Every year, I marvel at their tiny little stitches and how they’re still in perfect condition after so many years.
Meanwhile, most of our other ornaments look pretty rough. The plastic figurines have snapped-off limbs, the salt dough ornaments usually turn mushy after one season and we often smash a couple of bulbs at some point. Since I love to sew, I decided to try making my own set of felt Christmas tree ornaments. It’s something I wish I’d done when my children were smaller, since felt ornaments are much safer for babies and toddlers. Nothing to crack or shatter!
Felt is very inexpensive at craft stores and dollar stores and the only other supplies you’ll need are a pair of scissors, an embroidery needle, embroidery floss and a bit of cotton stuffing. (You can buy stuffing, but I just cut open an old pillow I found in the very back of the linen closet.)
Are you ready to get crafty and create something with your hands (preferably while relaxing on the couch in front of a good show)? Here’s how to make your very own felt Christmas tree ornaments.

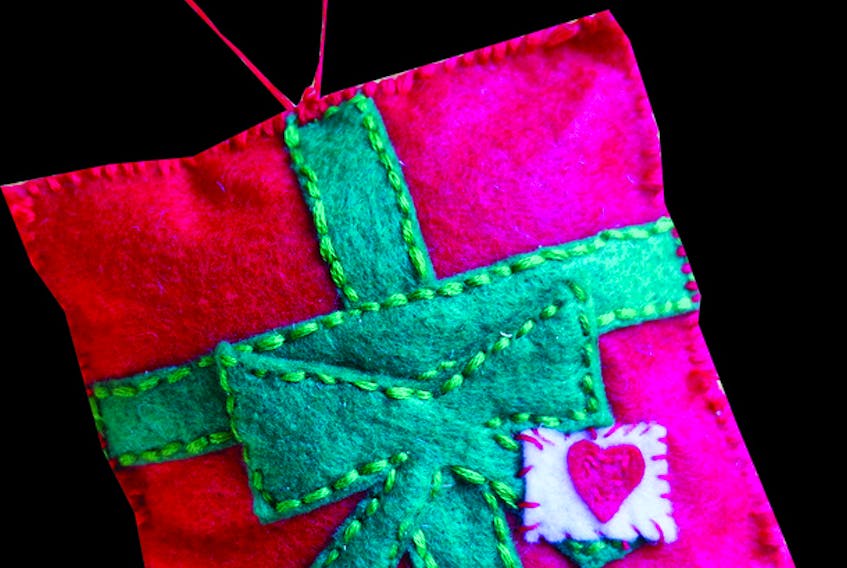
DIY felt present ornament
Pieces to cut out:
Two red squares (one front, one back)

Two skinny green rectangles for the ribbon
One green bow (or two, to double up if you’d prefer)
One tiny white rectangle (for the tag)
One tiny red heart (to put on the tag)
Instructions:
1. Pin the skinny green rectangles of ribbon (one running horizontally and one running vertically) onto one red square and stitch them in place with green embroidery floss.
2. Place the green bow over the ribbon and stitch it in place.
3. Stitch the red heart onto the white tag and use red embroidery floss to stitch the tag onto the present. (I forgot this step and did it last, but it’s easier to do at this point.)
4. Stitch the front of the present to the back of the present around three sides. Poke stuffing into the opening and stitch up the fourth side.
5. Sew a loop of embroidery thread onto the top of the ornament so it’s ready to hang.

DIY felt star ornament
Pieces to cut out:
Two large yellow stars (one front, one back)
One smaller golden star (front accent)

Instructions:
1. Pin the small golden star to the front of the yellow star and stitch around the edge with yellow or gold embroidery floss. (You can also run decorative stitching around the small star, if you’d like.)
2. Stitch the front of the star to the back of the star most of the way around. Poke stuffing inside the star and stitch up the gap.
3. Sew a small yellow or gold button to each of the five star points.
4. Sew a loop of yellow ribbon onto the top of the star so it’s ready to hang.

DIY felt Christmas tree ornament
Pieces to cut out:
Two large green trees (one front, one back)
Two small yellow stars (optional)
Fifteen to 20 tiny multi-coloured triangles with the tips snipped off (for the light bulbs)

Instructions:
1. Thread an embroidery needle with green embroidery floss and stitch a meandering squiggly down the front of the tree. This is the cord of the Christmas lights.
2. One by one, stitch each light bulb with co-ordinating thread so it’s connected to the cord. Do a mixture of pointing-up lights and pointing-down lights and try to space out similar colours.
3. Stitch the back of the tree to the front of the tree around the edges with green embroidery floss, making sure to leave a gap at the base to add the stuffing. Once your tree is nice and fluffy, stitch up the gap.
4. Optional: Stitch the two stars together with the top of the tree sandwiched in between.
5. Sew a loop of embroidery floss onto the top of the tree so it’s ready to hang on your actual Christmas tree.
This content originally appeared in YULETIDE PREPARATIONS, a SaltWire custom publishing title.